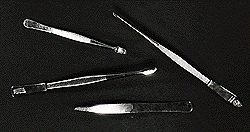
One of the first and most important lessons a collector should learn is the use of stamp tongs. These are tweezerlike tools, especially made for stamps, without the harsh metal edges found on dime-store tweezers.
Tongs are available in a variety of styles and sizes
Stamps should seldom (ideally, never) be handled by fingers. Even the cleanest, driest hands may leave traces of skin oil that can stain the stamp or disturb the gum. Obviously, stamps should never be handled with wet or dirty hands. In newer issues with metallic ink, it is even possible that the ink will tarnish on contact with the skin.
Well-made stamp tongs can be had in many varieties. Spade tongs have the ends flat and thin. Professional tongs are long (5 inches to 7 inches), and have sharp pointed ends. Several versions exist between those two extremes. Whichever style you select, tongs will be a minor cost for the protection they will give your stamps from finger handling.
Soaking Stamps
Most stamps will be safe in cold-water soaking to remove them from an envelope or other paper. Some inks are fugitive, however, and may run when immersed in water. Such stamps are usually indicated in standard catalogs. Even with careful handling, these issues are best left on paper, lest they be damaged.
Be careful of colored papers and some cancellation inks, particularly purple inks. These will run when immersed, often so badly that they will affect other stamps in the water bath.
Stamp lifts are available. These are miniature sweatboxes, constructed so that a water-soaked sponge lies beneath an open grillwork platform on which the stamp is placed. The moisture in the stamp lift removes the stamp from paper without having the stamp immersed in water. This may take several hours, however, and only one or two stamps usually can fit into a stamp lift. It is a slower process than using a water bath, but it is preferable when the stamp involved is of some value.
Stamps should be allowed to soak or lift until they come free of the paper. They should be removed at that point and allowed to dry. Placing them between blotter-like papers under a small weight will ensure that they dry flat and unwrinkled.
Stamp Storage
Stamps may be stored in albums, stock books, envelopes and boxes. However they are stored, they should be kept as free as possible from the ravages of excessive heat and humidity. Air conditioning and dehumidifiers help here, especially in tropical areas and during the more humid months in many U.S. locales. If stamps are kept in safe-deposit boxes, such bank locations should be air-conditioned.
Keeping stamps in unheated rooms, such as attics and garages, is unwise. Placing them near a basement furnace is courting disaster. It's also advisable to avoid, if possible, spots within a room that receive direct sunlight. Sunlight can fade stamps, and the sun's heat can soften gum, causing mint stamps to stick together.
Albums and stock books should be stored upright, so that the weight of additional albums piled on top is avoided.
Like people, stamps need to breathe once in a while. Regardless of where you store them, it is a good idea to take your albums and stock books off the shelf frequently and open them, page by page. Just a few moments of air circulation will help prevent gum and paper damage that can occur when stamps are left for weeks and months in an airless environment.
Duplicates and other loose stamps may be safely relegated to something like the proverbial cigar box, providing the containers in which they are placed have no migratory glue, grease or wax that can affect them. Storing them in glassine envelopes within boxes is a worthwhile precaution.
Keep an eye out also for possible insect infestation. The gum on stamps can be a delicacy for roaches, silverfish and all sorts of crawling, creeping insects. Many a collector has left a collection untouched and unexamined for months, only to find that moisture, sun, heat, the lack of fresh air or insects have caused irreparable havoc to his stamps. Dealers storage of stamps is, of course, just as subject to these hazards as collector storage.
Mounting Stamps
Whether you use preprinted album pages (about 90 percent of collectors do) or plain pages, you still have to mount the stamps somehow. It matters little whether the album itself is a $100 gold-stamped, leather one or simply a good three-ring binder. So long as the pages are substantial enough for the material placed thereon, how you mount your stamps poses the same problems.
Two basic methods exist: hinges and mounts.
Many experienced collectors will tell you that the great collections of the world have usually been hinged. If you are saving used stamps, there is little reason to consider any other more expensive method. But when many of those fine collections were formed in the past, hinge-mounting was the only process available. If you are saving mint copies, you may wish to use nothing but plastic mounts.
If you are saving used stamps, there is little reason to consider any other more expensive method than hinges.
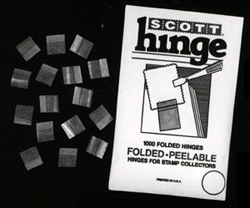
If you hinge your stamps, be certain to use peelable stamp hinges especially made for that purpose. Never stick stamps down with their own gum, and never use any of the commercial tapes now on the market to affix stamps. Don't try to make your own hinges from paper and the commercial glues found in many stores. Most of these glues and tapes contain chemicals that react with the stamps. Good stamp hinges cost as little as one-fifth of a cent.
Using hinges, however, is not as easy as it may appear. When properly applied, they will hold your stamps in rank-and-file order, and keep them in good condition for easy removal if necessary.
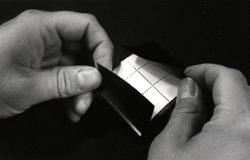
Most stamp hinges sold today come prefolded. The smaller folded portion goes as close to the top of the stamp as possible, without being visible from the stamps face side. The larger fold holds the stamp to the page. Placing the hinge to the top of the stamp will allow you to lift it with tongs, after it has been applied to the page, to examine the back of the stamp. That's why the pieces of gummed paper are called "hinges"; they hinge the stamp so you can gently raise it without removing it from the page.
Apply the small part of the hinge to the stamp first. When you lick it, and later the larger portion that sticks to the page, do so carefully. Keep the moisture as far from the fold in the hinge as possible. Don't lick the hinge as though you were licking an ice cream cone; merely a touch of the tongue is enough to hold the stamp properly.
The biggest mistake that most collectors make is using too much moisture. The second biggest mistake is trying to remove and reposition a stamp that has already been hinged to a page. If you are not happy with the placement of a newly hinged stamp, never try to move it at once. The glue first must dry thoroughly before the stamp and hinge can be taken off the page for another attempt. You may tear the stamp if you remove it with a wet hinge. Wait for a half hour, go on to other stamps, and then come back to remove the misplaced stamp.
The development of pocket-style mounts with a transparent front, and either a clear or black backing that adheres to the page, was probably responsible for the "never-hinged" craze that exists today. Before these came along, hinging was the only way to mount. Many stamp experts and dealers are dubious about U.S. issues of the 1800s that are sold as "never-hinged. " If these came from old collections, they are probably regummed.
Transparent, gum-protecting mounts come precut to fit most sizes and shapes needed for stamps, covers and souvenir sheets. Showgard and Scott make them with the backs split horizontally so the stamp may be inserted and kept in place at the top and bottom. Hawid makes plastic mounts that are open on three sides; only the bottom is sealed. Other varieties also exist.
If you are adamant about keeping the gum sides of your stamps clean and pristine, plastic mounts are the only choice.
Most mount makers make their products available in long strips that can be cut to size for any unusual shapes or se-tenant combinations of stamps. These are cheaper and more flexible than the precut sizes. However, they do require a razor blade and metal ruler, or a special gadget that looks like a miniature paper cutter, to slice a mount neatly and squarely.
If you are adamant about keeping the gum sides of your stamps clean and pristine, plastic mounts are the only choice. If that is of little or no importance, hinges will do the job just as well at a much cheaper cost. Plastic mounts usually sell for about 2 1/2˘ to 3˘ per stamp; much more for larger pieces.
Whichever route you take, it is wise to follow this precept: Within an album or collection of stamps, use either hinges or mounts consistently. Side by side, album pages will look peculiar if some stamps are hinged and some are mounted.